A few years ago, I cobbled together a sensor to monitor the water level of my Christmas tree. Like a bad holiday movie, it’s since sucked me in for a few more hours of tinkering each year. Although its main function is largely unchanged, I’ve added a few more bells and whistles along the way. I upgraded the scrap metal + FoodSaver bag sensing probe to a custom PCB and changed the software platform from Arduino + Adafruit IO to ESP Home, unlocking the full smart home automation power of Home Assistant. The result is a reliable and relatively power-efficient Christmas tree water monitoring system with data logging, level alerts, and Apple watch integration!
This past Christmas my wife went all out and got me the Ferrari of tree stands! It’s got a terminator-inspired, tree-gripping claw that should attenuate the stream of obscenities that have become such an integral part of the our tree trimming tradition with the current stand. Most importantly, it features an enclosed design with no easy access to the water. Although this is of little interest to most, it could be a gamechanger for us and our water obsessed dog who will stop at nothing to get at that sweet, sweet H20. (I promise we’re not horrible dog owners – she has a drinking problem and will drink any and all water available to her so we have to limit her to a reasonable amount each day!) Of course with no access to the water tank, I’ll have to dream up an entirely new sensing method (more on that when the time comes). But before this era comes to a close, here’s a breakdown on what – as far as I can tell – may very well be the bleeding edge of Tannenbaum thirst tracking tech.
Smart Home Integration (Home Assistant + ESP Home)
As I mentioned in my initial post, AdafruitIO was a good starting point for getting data up to the cloud – especially if you’re already familiar with Arduino, but feature-wise it was pretty limited. Home Assistant is an awesome open source home automation platform that can run on a raspberry pi and opens up a whole slew of possibilities. ESPHome is a magical system that enables you to easily turn any ESP32 based board into a sensor that Home Assistant recognizes – all with human-readable YAML configuration files – no coding necessary! Put it all together and you can quickly do things like:
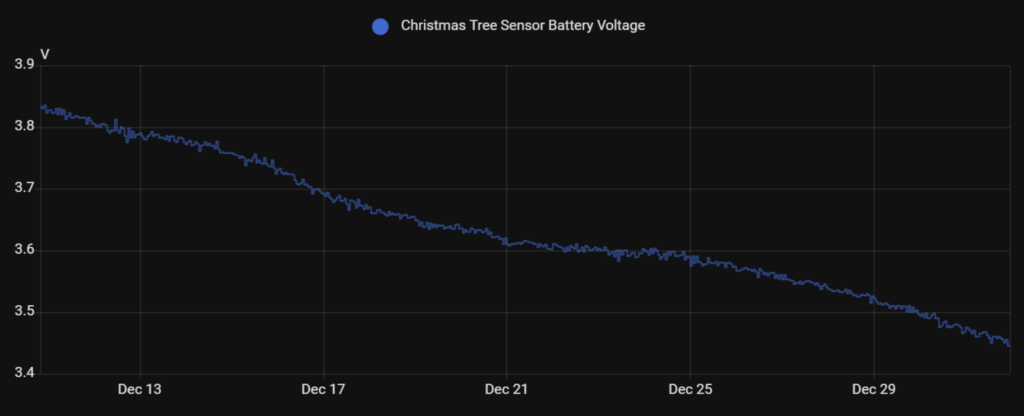
Look at history charts of the Christmas tree water and battery levels over time:
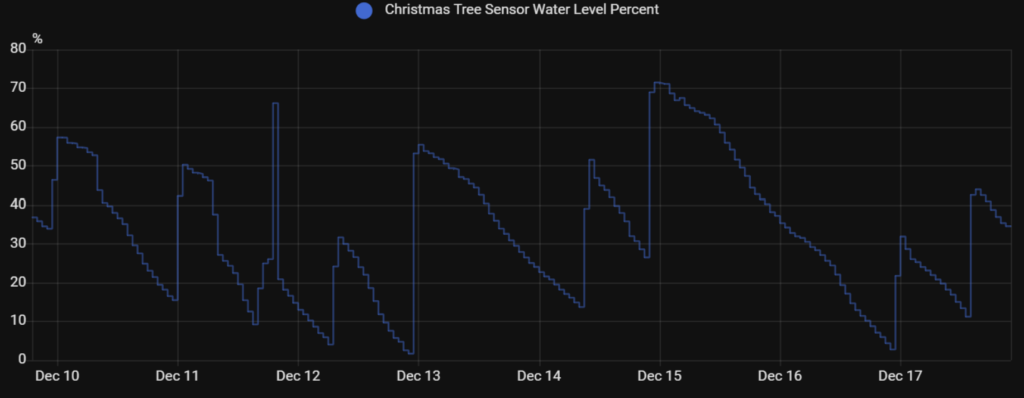
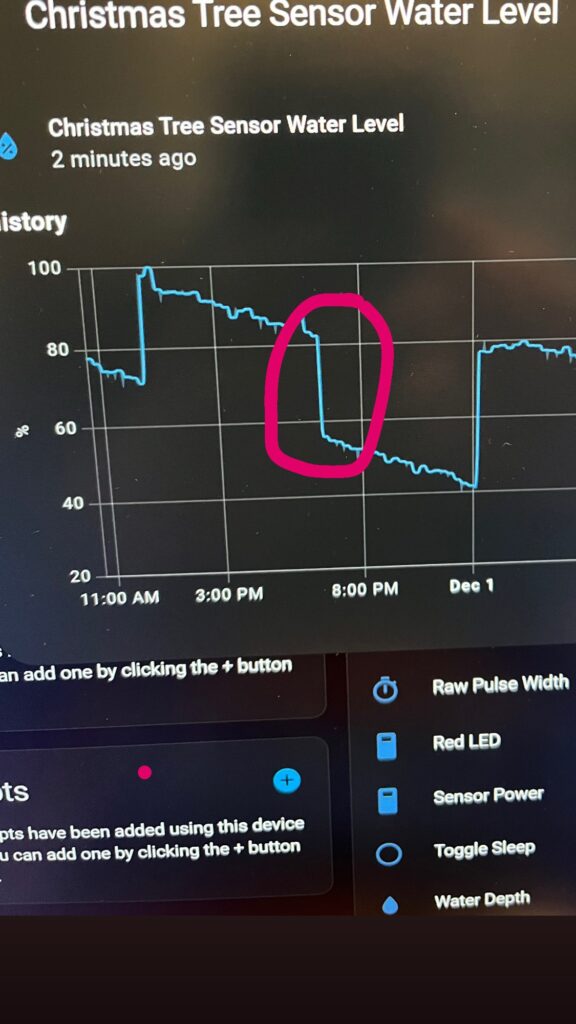
Use history charts to catch a water thief in the act:
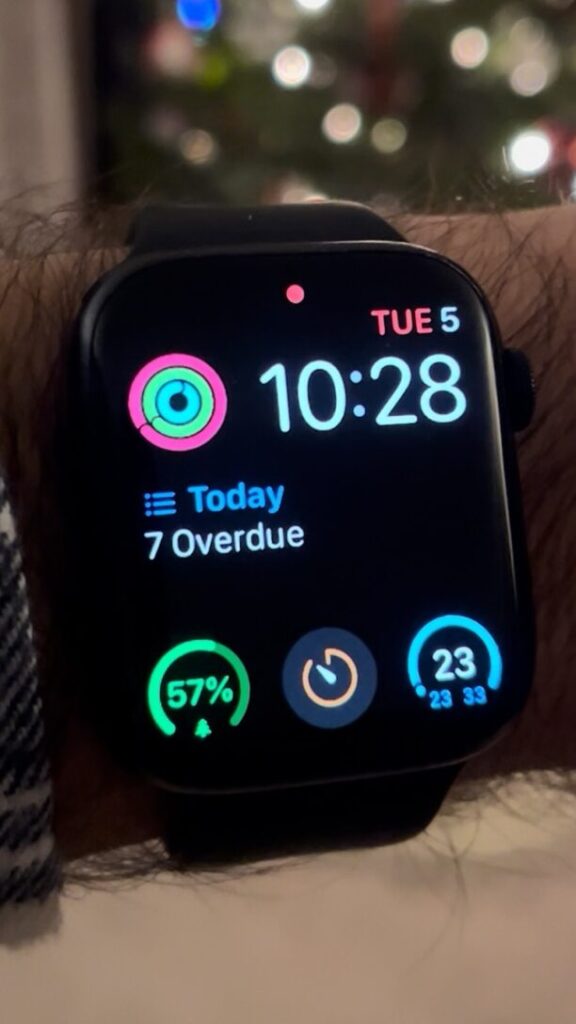
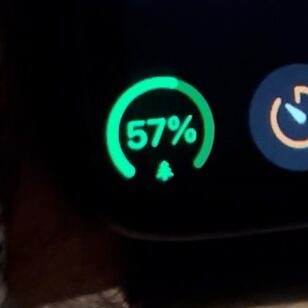
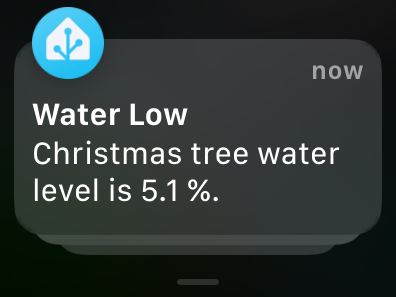
Show the water level in real time on your wrist and get notifications when its low:
Play “O Tannenbaum” on maximum volume and flash all the lights in the house when the water gets low (I’ll let you try that one).
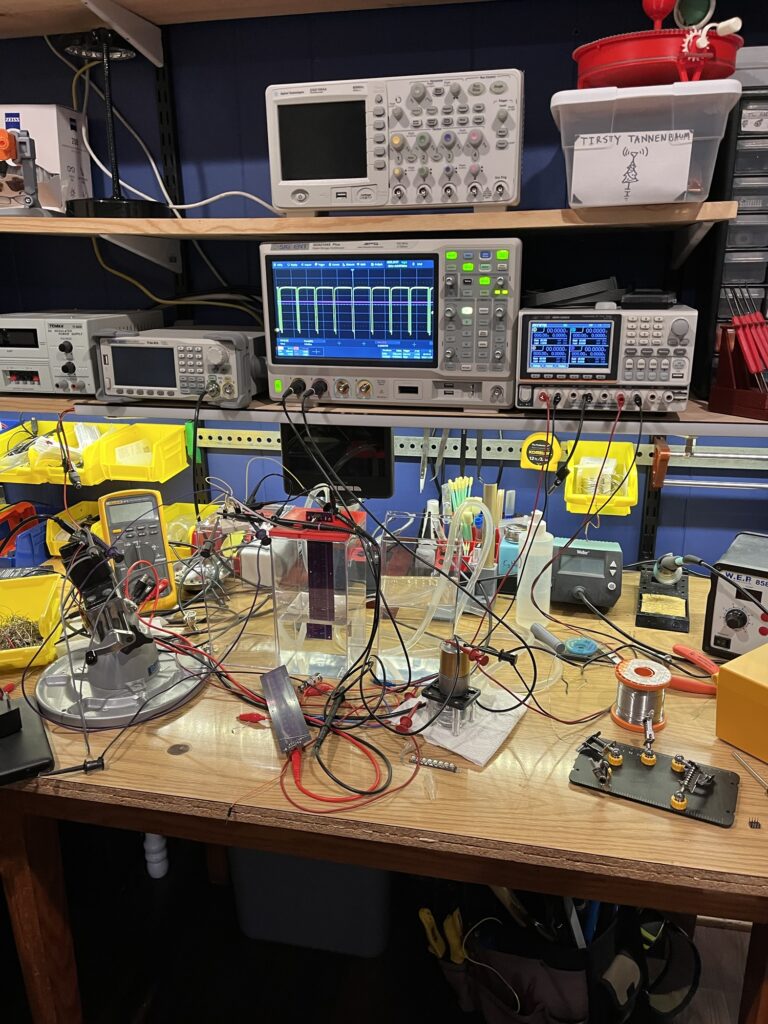
Sensor Hardware
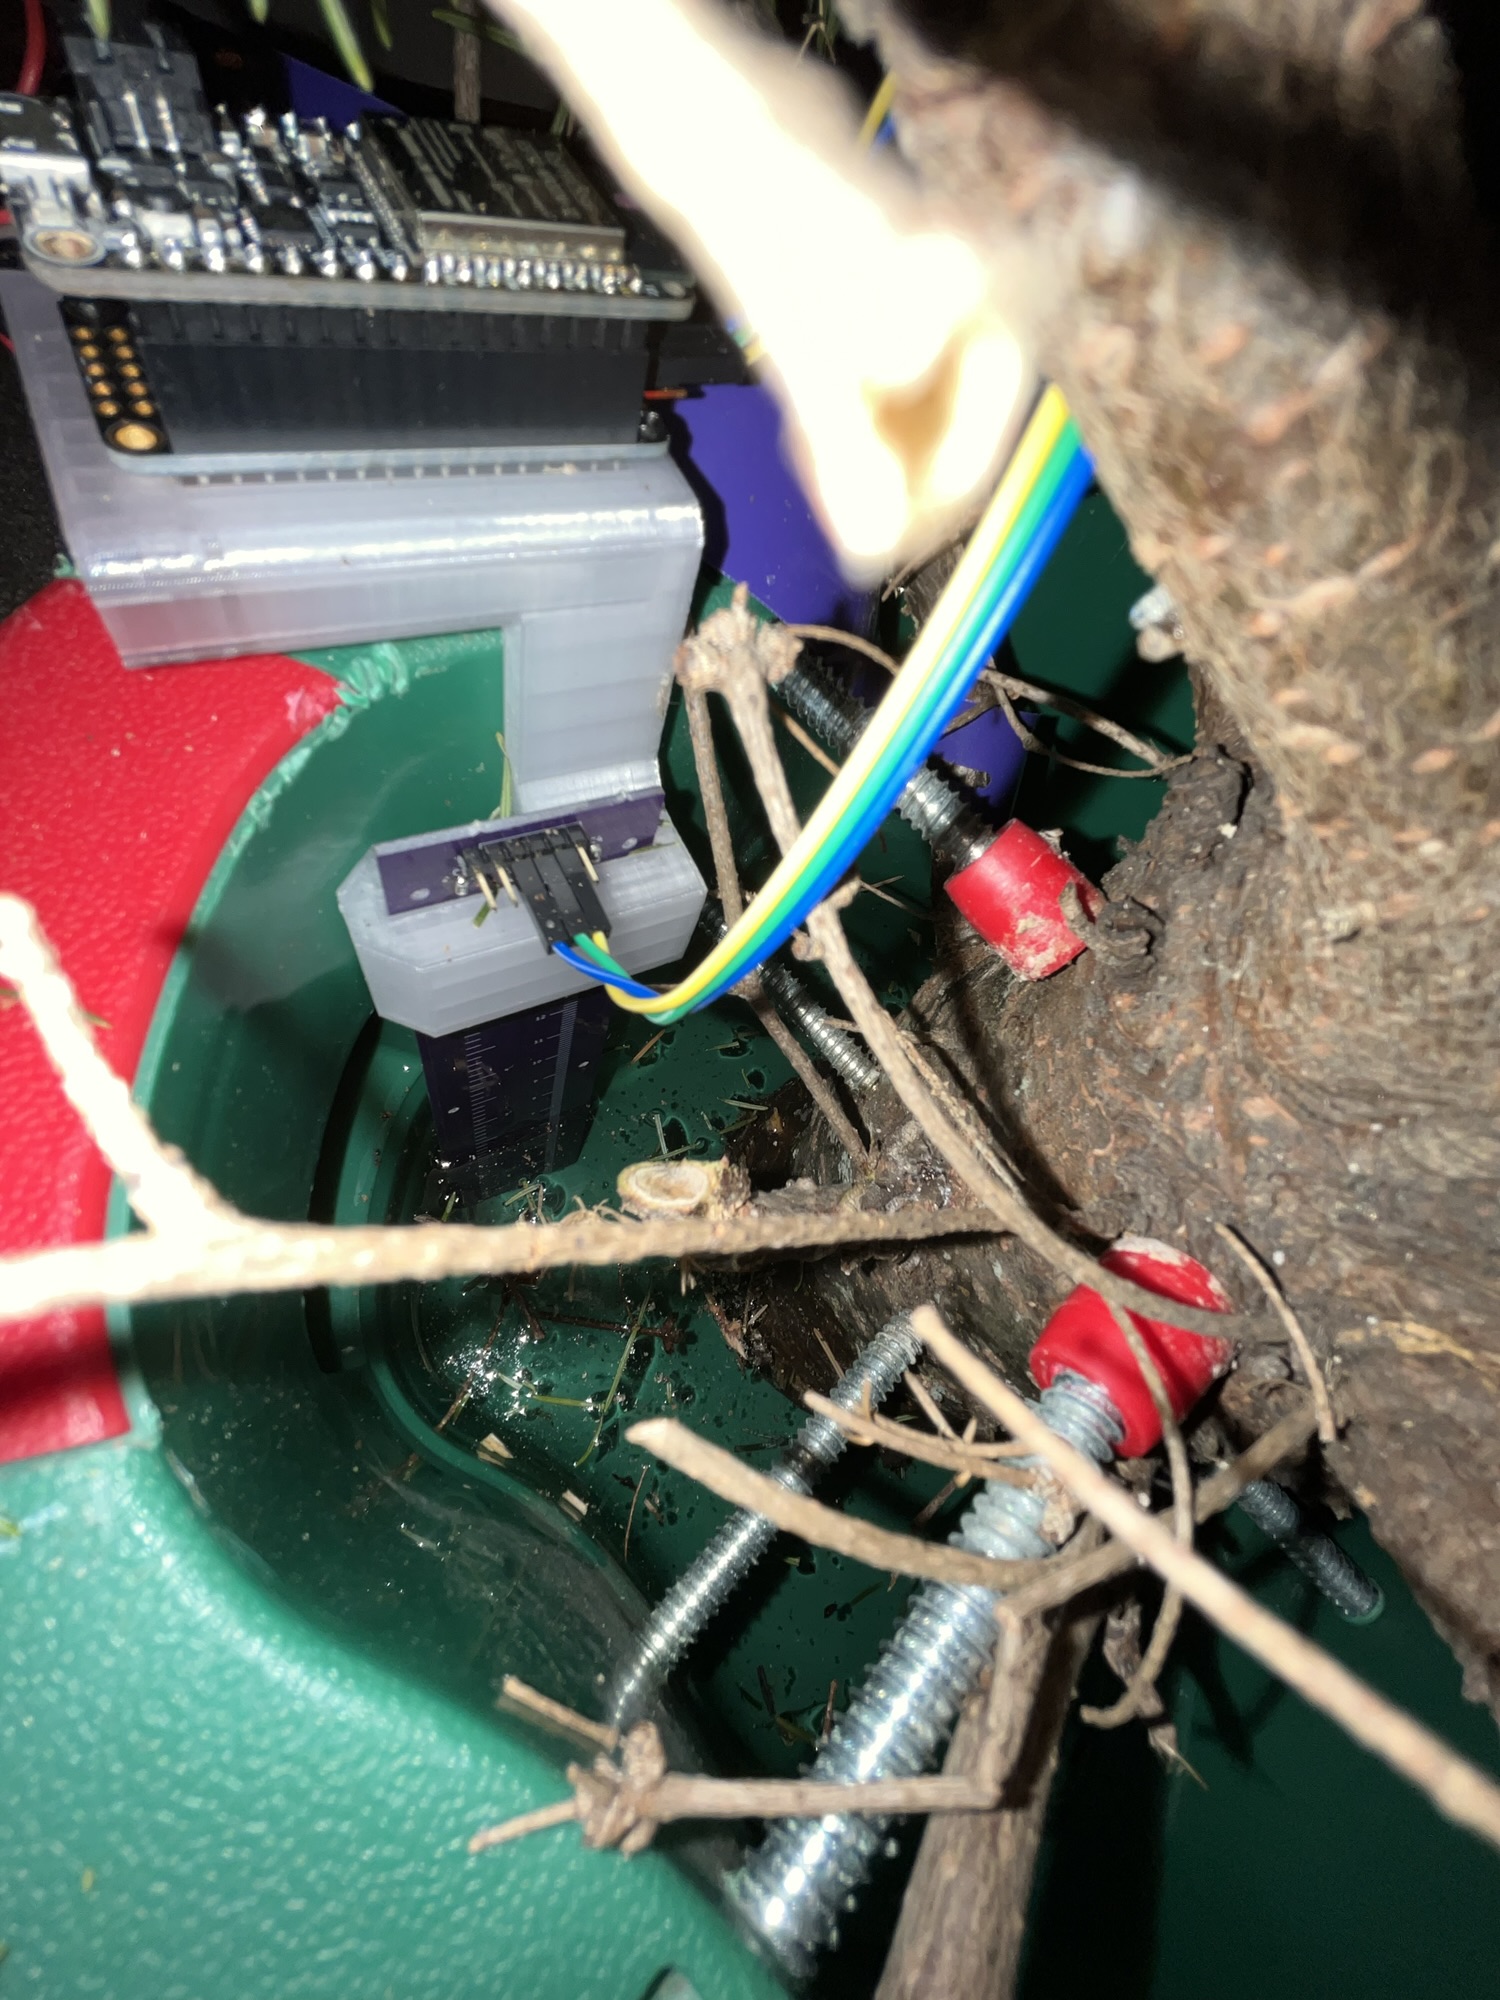
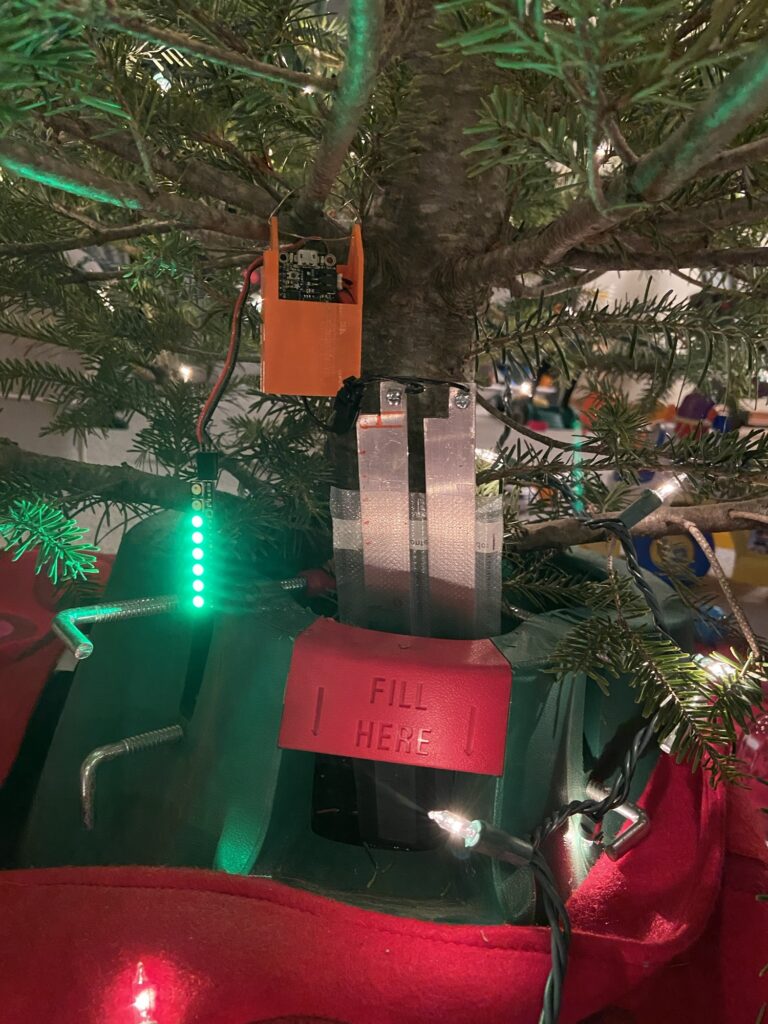
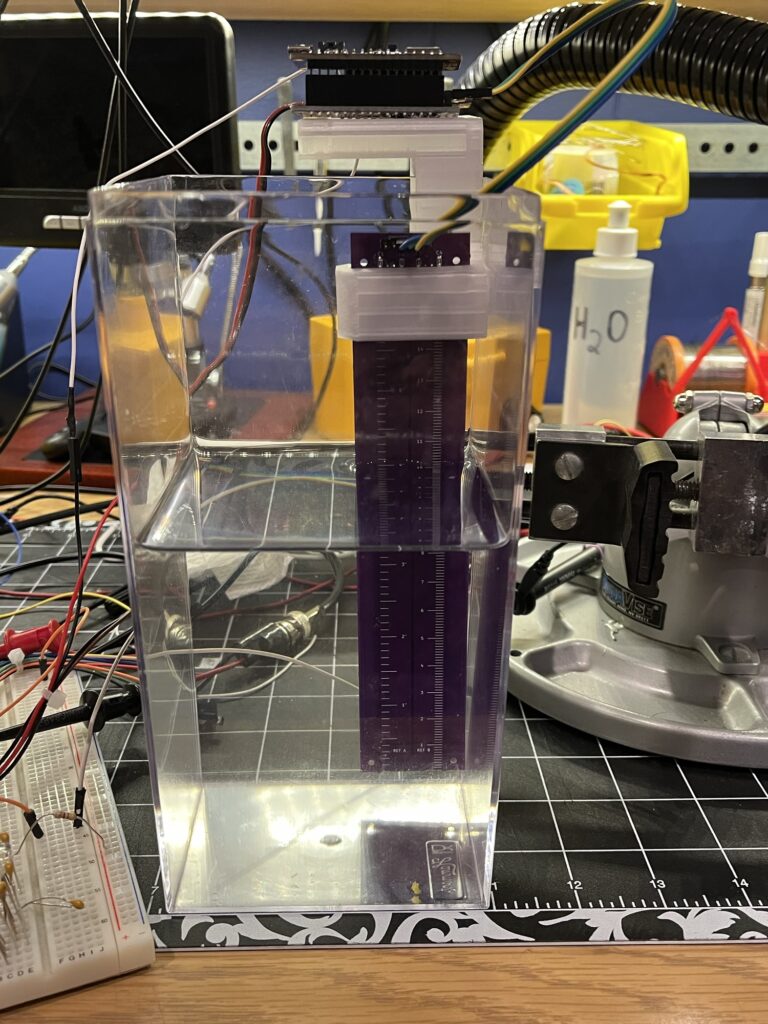
Like the original sensor, the current version is still fundamentally just a plate capacitor whose capacitance changes with the depth of the water. The Adafruit HUZZAH32 remains the brains of the operation that publishes the data to my Home Assistant server over Wi-Fi.
Original design:
Final design:
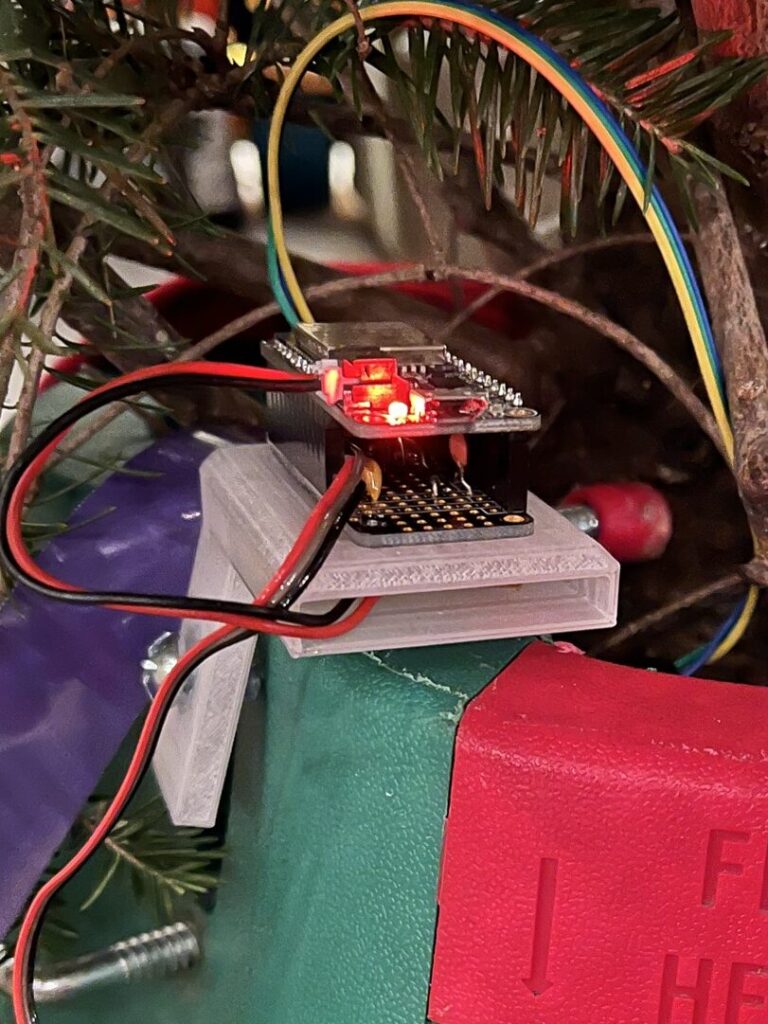

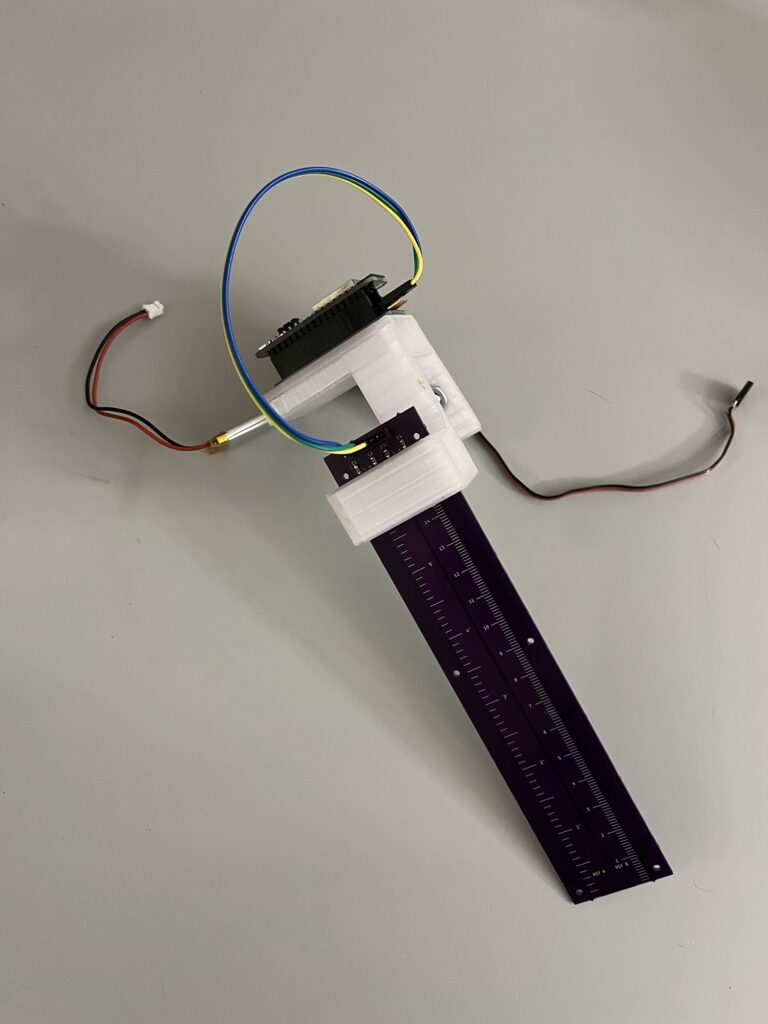
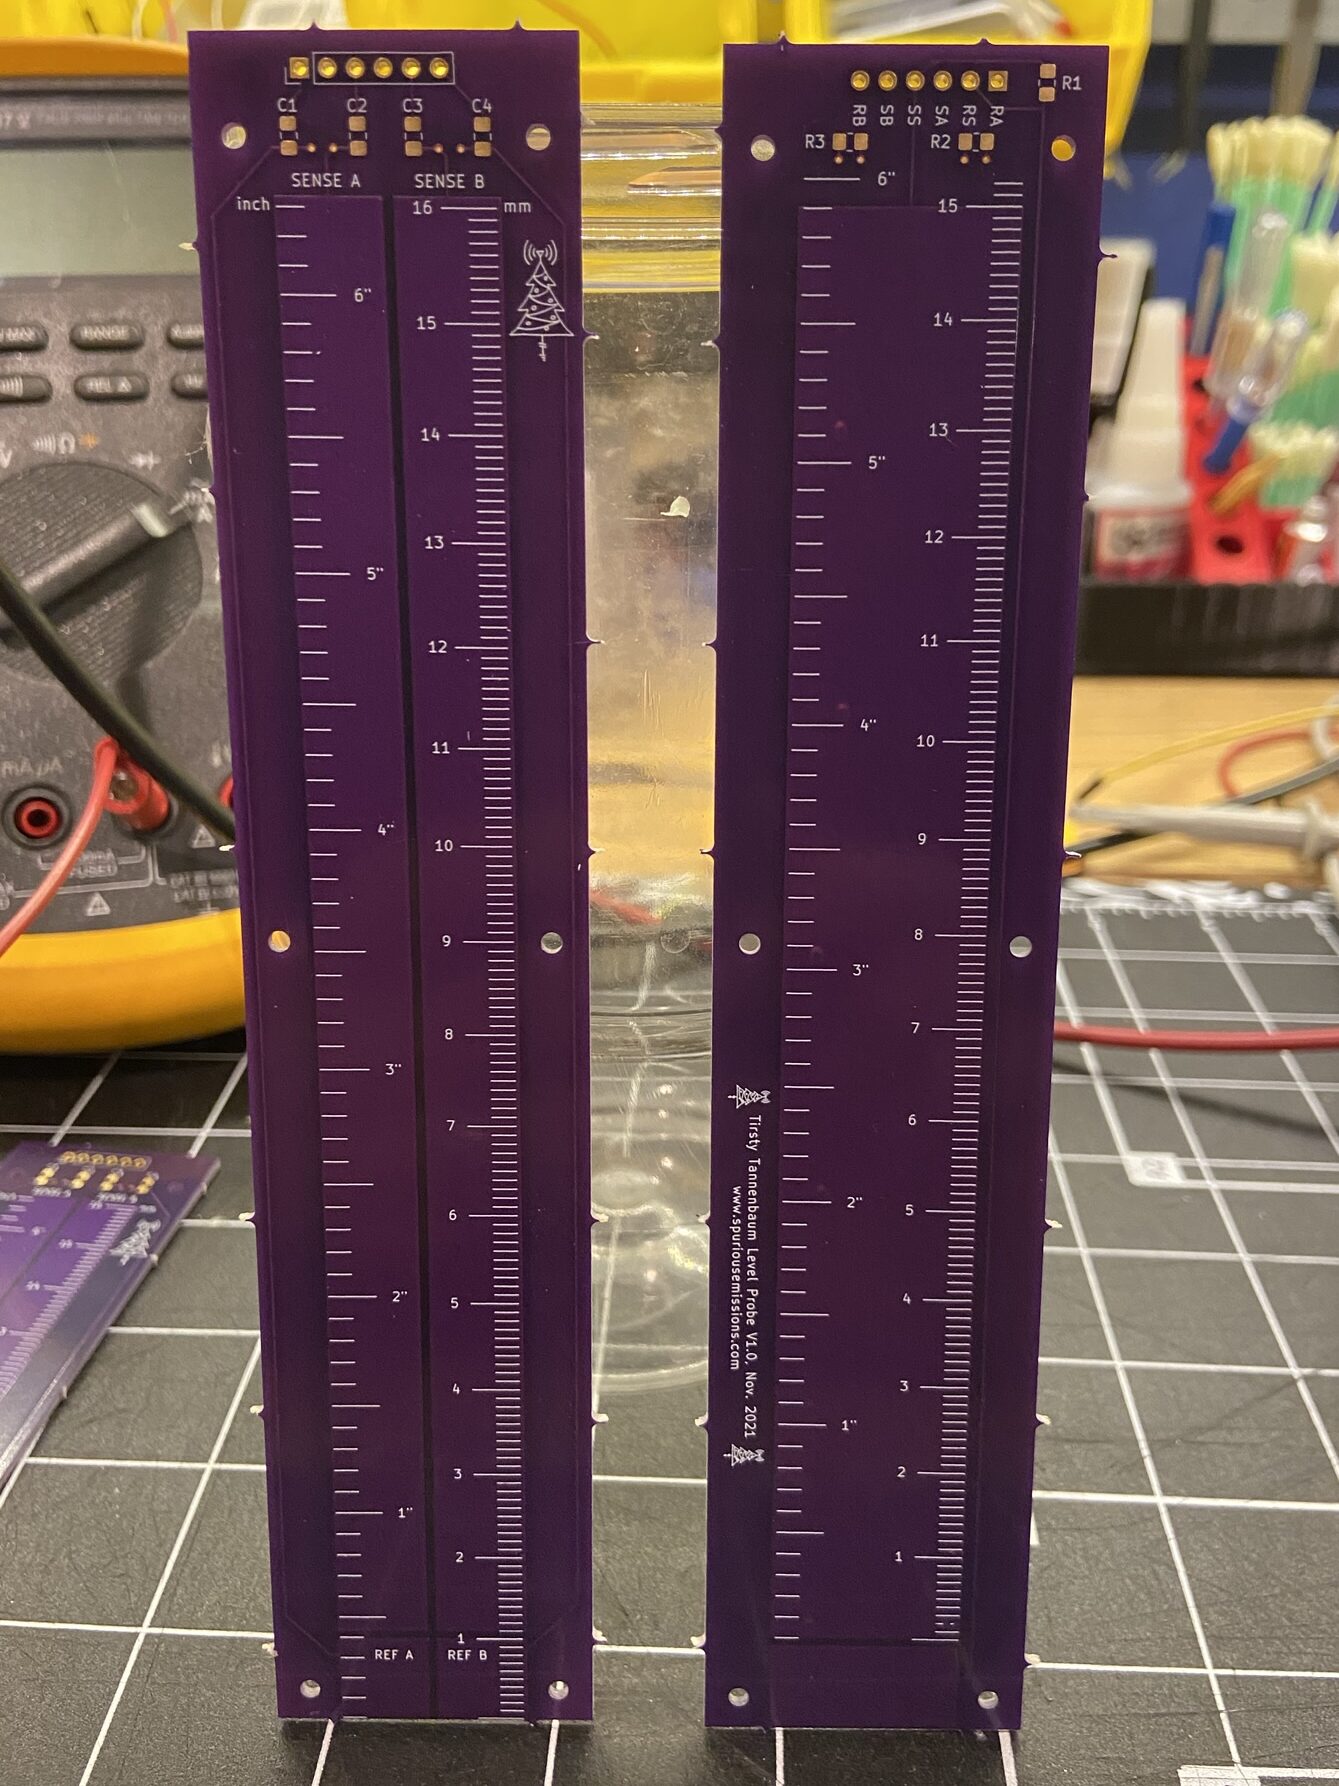
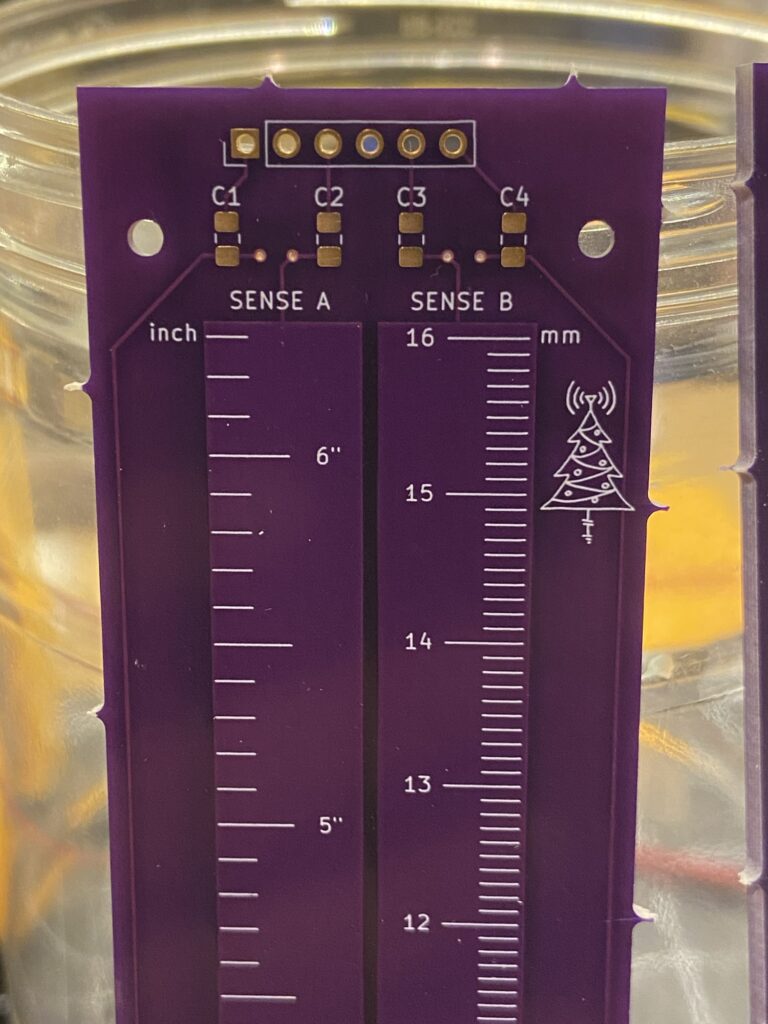
First, I upgraded the sensing element to a bonifide PCB (view here in Kicanvas). Two wide traces on the top/front side make up the sensing elements. Below the left and right traces, I included reference sections that are electrically isolated from the sense portions above. By always being underwater, the reference section would allow me to measure the capacitance of a fixed, known depth and use it to compensate for any variations in the dielectric of the water. The big copper pour on the bottom/back side was added to serve as shielding, based on similar designs I’d seen online. I did some experimentation with both the relative sensing mode and the shielding but neither seemed to work well enough in practice to be worth the hassle in this application.
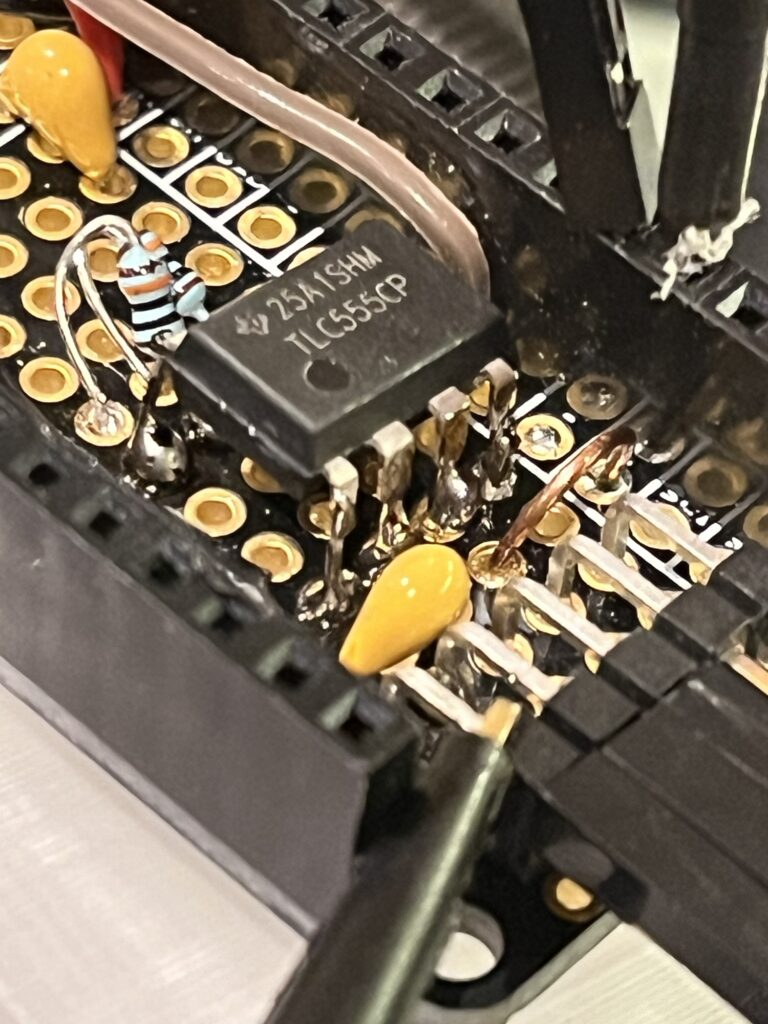
In the previous circuit, the ESP32 determined the water level directly by generated a square wave drive signal and measuring the voltage at the node between the sensing probe and a reference capacitor. The new method uses a trusty 555 timer chip as a capacitance-to-frequency converter. This simplifies the microcontroller’s job, as it only needs to measure the frequency of 555’s output signal – something that ESPHome is capable of doing out of the box with the Pulse Width Sensor component.
As the water level increases, the capacitance increases, which decreases the frequency of the output signal. The raw pulse width values get sent through additional ESPHome blocks for filtering and calibration and out pop the water depth values used by Home Assistant. A couple more lines of YAML provide battery monitoring, OTA update, and low power capabilities. All without writing a single line of C code!
If you’re interesting in making one for yourself, I’ve shared the PCB design on OSHPark.
SCHEMATIC
[TODO: upload schematic, waveforms, and battery life analysis]
Testing and Calibration
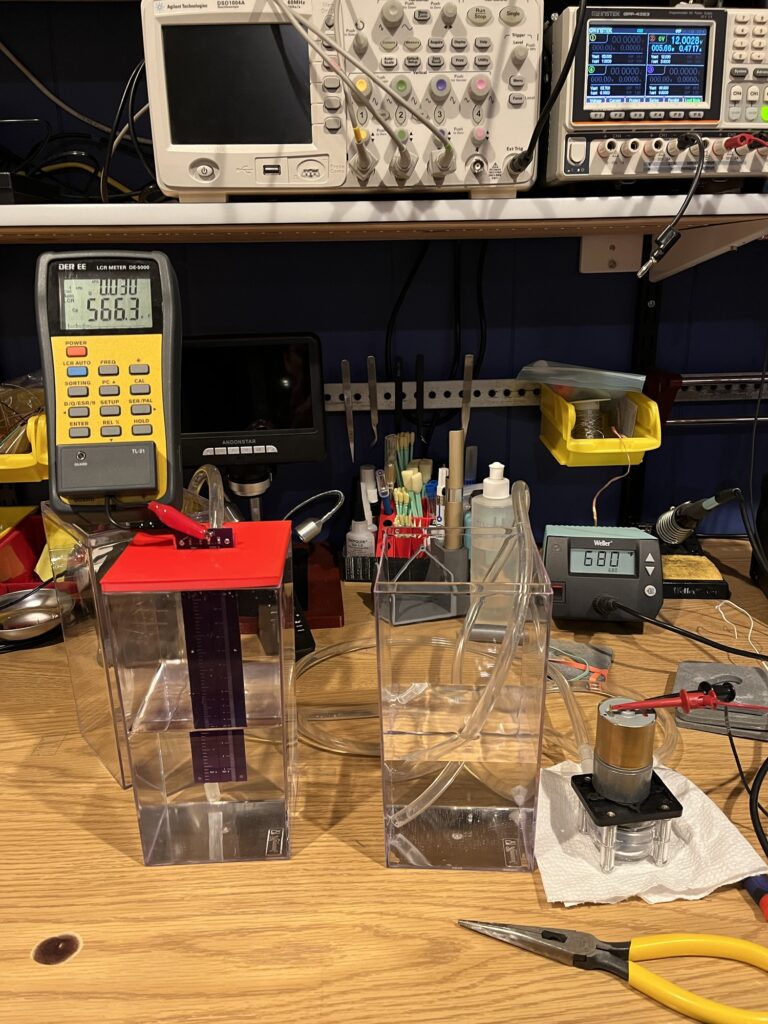

Sensor ESP Home (Firmware)
Through the magic of ESPHome, the sensor is programmed entirely with the YAML file below. It’s over the air updatable, which really comes in handy when the thing is installed in the tree. Since Wi-Fi is fairly power hungry, I conserve power by only taking a measurement once every 15 minutes and then putting the device back into deep sleep.
One caveat of this sleepy approach is that ESPHome’s normal OTA process doesn’t really work because the device is almost never awake to receive the messages to initiate the update. This can be overcome by changing the protocol used to communicate with Home Assistant from the HTTP (the default) to MQTT. Because MQTT sends messages through a broker instead of directly between client and host, it’s possible to leave messages on the broken even when one side isn’t connected. In this case, the sensor checks if there’s a “keep awake” message on the server each time it wakes up, which will – you guessed it – keep it from going to sleep immediately. Once it’s awake, the OTA process can proceed as normal.
Here’s the YAML file in full which you can also find on GitHub.
esphome:
  name: christmas_tree_sensor
  friendly_name: Christmas Tree Sensor
  # turn on the LED white at boot
  on_boot:
    then:
      - light.control:
          id: neopixel_light
          state: on
          effect: "Flicker"
          red: 50%
          green: 50%
          blue: 50%

esp32:
  board: adafruit_feather_esp32_v2
  framework:
    type: arduino

# Enable logging
logger:

# Not using this anymore - switched to MQTT so I can send custom signals needed to remotely keep device awake for OTA DFU
# Enable Home Assistant API
# api:
#   encryption:
#     key: <your key here>

# Defines a script that can be called elsewhere in the YAML that prevents the device from sleeping
script:
  id: keep_awake
  then:
    - logger.log: "OTA mode ON"
    - deep_sleep.prevent: deep_sleep_1
    - light.control:
        id: neopixel_light
        state: on
        effect: "Fast Pulse"
        red: 0
        green: 0
        blue: 50%

# Configure the MQTT connection
mqtt:
  broker: 192.168.1.63
  username: !secret mqtt_user
  password: !secret mqtt_password
  # clearing birth and will messages allows device to show up in HA as available while asleep
  birth_message:
  will_message:
  on_message:
    # Keep the device awake if "ON" is published to the "ota_mode" topic
    - topic: christmas_tree_sensor/ota_mode
      payload: 'ON'
      then:
        - script.execute:
            id: keep_awake

    # Put the device to sleep if "ON" is published to the "sleep_mode" topic
    - topic: christmas_tree_sensor/sleep_mode
      payload: 'ON'
      then:
        - logger.log: "Sleep mode ON"
        - deep_sleep.enter: deep_sleep_1
  # start flashing the LED green when we connect to MQTT server
  on_connect:
    then:
      - light.control:
          id: neopixel_light
          state: on
          effect: "Fast Pulse"
          red: 0
          green: 50%
          blue: 0
  # start flashing the LED red if we disconnect from MQTT server
  on_disconnect:
    then:
      - light.control:
          id: neopixel_light
          state: on
          effect: "Fast Pulse"
          red: 50%
          green: 0
          blue: 0

# Over-the-air updates
ota:
  - platform: esphome
    password: "<your password here>"

wifi:
  # use_address: christmas_tree_sensor.local
  ssid: !secret wifi_ssid
  password: !secret wifi_password

  # Enable fallback hotspot (captive portal) in case wifi connection fails
  ap:
    ssid: "Christmas Tree Sensor Hotspot"
    password: "<your password here>"
  fast_connect: true

captive_portal:

switch:
  # - platform: gpio
  #   name: "Red LED"
  #   pin: GPIO13 # Red LED
  #   entity_category: 'diagnostic'

  - platform: shutdown
    name: "ESP32 Shutdown"

  - platform: gpio
    entity_category: 'diagnostic'
    name: "Sensor Power"
    pin: GPIO32
    restore_mode: ALWAYS_ON

# Blink if error (fast) or warning (slow), otherwise off
status_led:
  pin: GPIO13 # Red LED

light:
  - platform: neopixelbus
    id: neopixel_light
    entity_category: 'diagnostic'
    type: GRB
    variant: WS2812
    pin: GPIO0
    num_leds: 1
    name: "NeoPixel Light"
    effects:
      - pulse:
          name: "Fast Pulse"
          transition_length: 0.5s
          update_interval: 0.5s
          min_brightness: 0%
          max_brightness: 50%

sensor:
  - platform: pulse_width
    entity_category: 'diagnostic'
    id: raw_pulse_width
    pin: GPIO14
    unit_of_measurement: "s"
    name: Raw Pulse Width
    update_interval: 0.1s
    accuracy_decimals: 9
    state_class: measurement
    device_class: duration
    filters:
      - sliding_window_moving_average:
          window_size: 10
          send_every: 10
      - throttle: 5s
    expire_after: 30min

  - platform: copy
    entity_category: ''
    id: water_depth_mm
    source_id: raw_pulse_width
    icon: "mdi:water"
    unit_of_measurement: "mm"
    device_class: distance
    name: Water Depth
    accuracy_decimals: 1
    state_class: measurement
    filters:
      - calibrate_linear:
        - 0.000359 -> 109.0
        - 0.000091 -> 20.0
        # - 0.000030 -> 0.0
        # - 0.000078 -> 20.0
        # - 0.000265 -> 90.0
        # - 0.000333 -> 115.0


  - platform: copy
    entity_category: ''
    id: water_percent_full
    source_id: water_depth_mm
    icon: "mdi:water"
    unit_of_measurement: "%"
    name: Water Level Percent
    accuracy_decimals: 1
    state_class: measurement
    filters:
      - lambda: return min(max(x / 115.0 * 100.0, 0.0), 100.0);

  - platform: adc
    id: battery_voltage
    name: Battery Voltage
    device_class: battery
    update_interval: 0.1s
    accuracy_decimals: 2
    attenuation: auto
    pin: GPIO35
    filters:
      - multiply: 2.0 # voltage divider ratio is 1/2
      - sliding_window_moving_average:
          window_size: 10
          send_every: 10
      - throttle: 5s

  - platform: wifi_signal # Reports the WiFi signal strength/RSSI in dB
    name: "WiFi Signal dB"
    device_class: signal_strength
    id: wifi_signal_db
    update_interval: 60s
    entity_category: "diagnostic"

  - platform: copy # Reports the WiFi signal strength in %
    source_id: wifi_signal_db
    name: "WiFi Signal Percent"
    filters:
      - lambda: return min(max(2 * (x + 100.0), 0.0), 100.0);
    unit_of_measurement: "%"
    entity_category: "diagnostic"
    device_class: ""

deep_sleep:
  id: deep_sleep_1
  run_duration: 3s
  sleep_duration: 15min
  # wakeup_pin: GPIO36 # adds an extra 1.5 mA to deep sleep

binary_sensor:
  - platform: gpio
    name: Toggle Sleep
    entity_category: 'diagnostic'
    pin:
      number: GPIO38
      mode:
        input: true
      inverted: true
    filters:
       - delayed_on: 10ms
       - delayed_on: 10ms
    on_press:
      then:
        - script.execute:
            id: keep_awake
    on_double_click:
      then:
        - deep_sleep.enter: deep_sleep_1


Hi RK!
This is a very cool project, and exactly what I am looking to do for our tree. Have you deployed it yet for this season? Would you still be willing to update the post with further wiring schematics?
Bravo and thank you!
Thanks for the interest! I’ll try to add a schematic at some point but in the meantime it’s essentially just this Basic Astable 555 Oscillator Circuit with the sensing element in place of the capacitor that sets the frequency and whatever R’s are necessary to make it oscillate around a few kHz.
I have this new tree stand this year that has a built in float to show the water level. So of course I had to get that into Home Assistant – any guesses how?